
Templates
A Template is the schema definition in Omnismith. It combines a set of Attributes into a reusable blueprint that shapes how Entities (data records) are created, validated, searched, and visualized.
Think of a Template as a digital form design: once designed, you can create dozens, thousands, or millions of matching records from it.
1. Core Structure of a Template
Section titled “1. Core Structure of a Template”A Template consists of two main configuration areas:
- Basic Info:
- Name: Clear, descriptive template title (e.g.,
Support Ticket,Server Node,Customer Account). - Slug (Optional): A project-unique string identifier (e.g.
server_node,support_ticket) that enables deterministic API entity creation without querying template UUIDs. - Description: Optional operational notes explaining what data this template holds.
- Visual Styling: Icon and color customization for easy identification across the UI.
- Name: Clear, descriptive template title (e.g.,
- Attribute Composition:
- The list of attached Attributes (Dimensions, Metrics, Lists, References) that define the fields of records created under this template.
- Reordering fields to customize the entity form presentation.
2. Step-by-Step: Creating a Template
Section titled “2. Step-by-Step: Creating a Template”- Navigate to Blueprints → Template Library in the navigation launcher.
- Click + Add Template. The editor opens on its Schema tab, where you define the template.
- Basic panel:
- Enter a Name (e.g.
Server Node). - Enter an optional Slug (e.g.
server_node). - Set an optional Category and Description.
- Enter a Name (e.g.
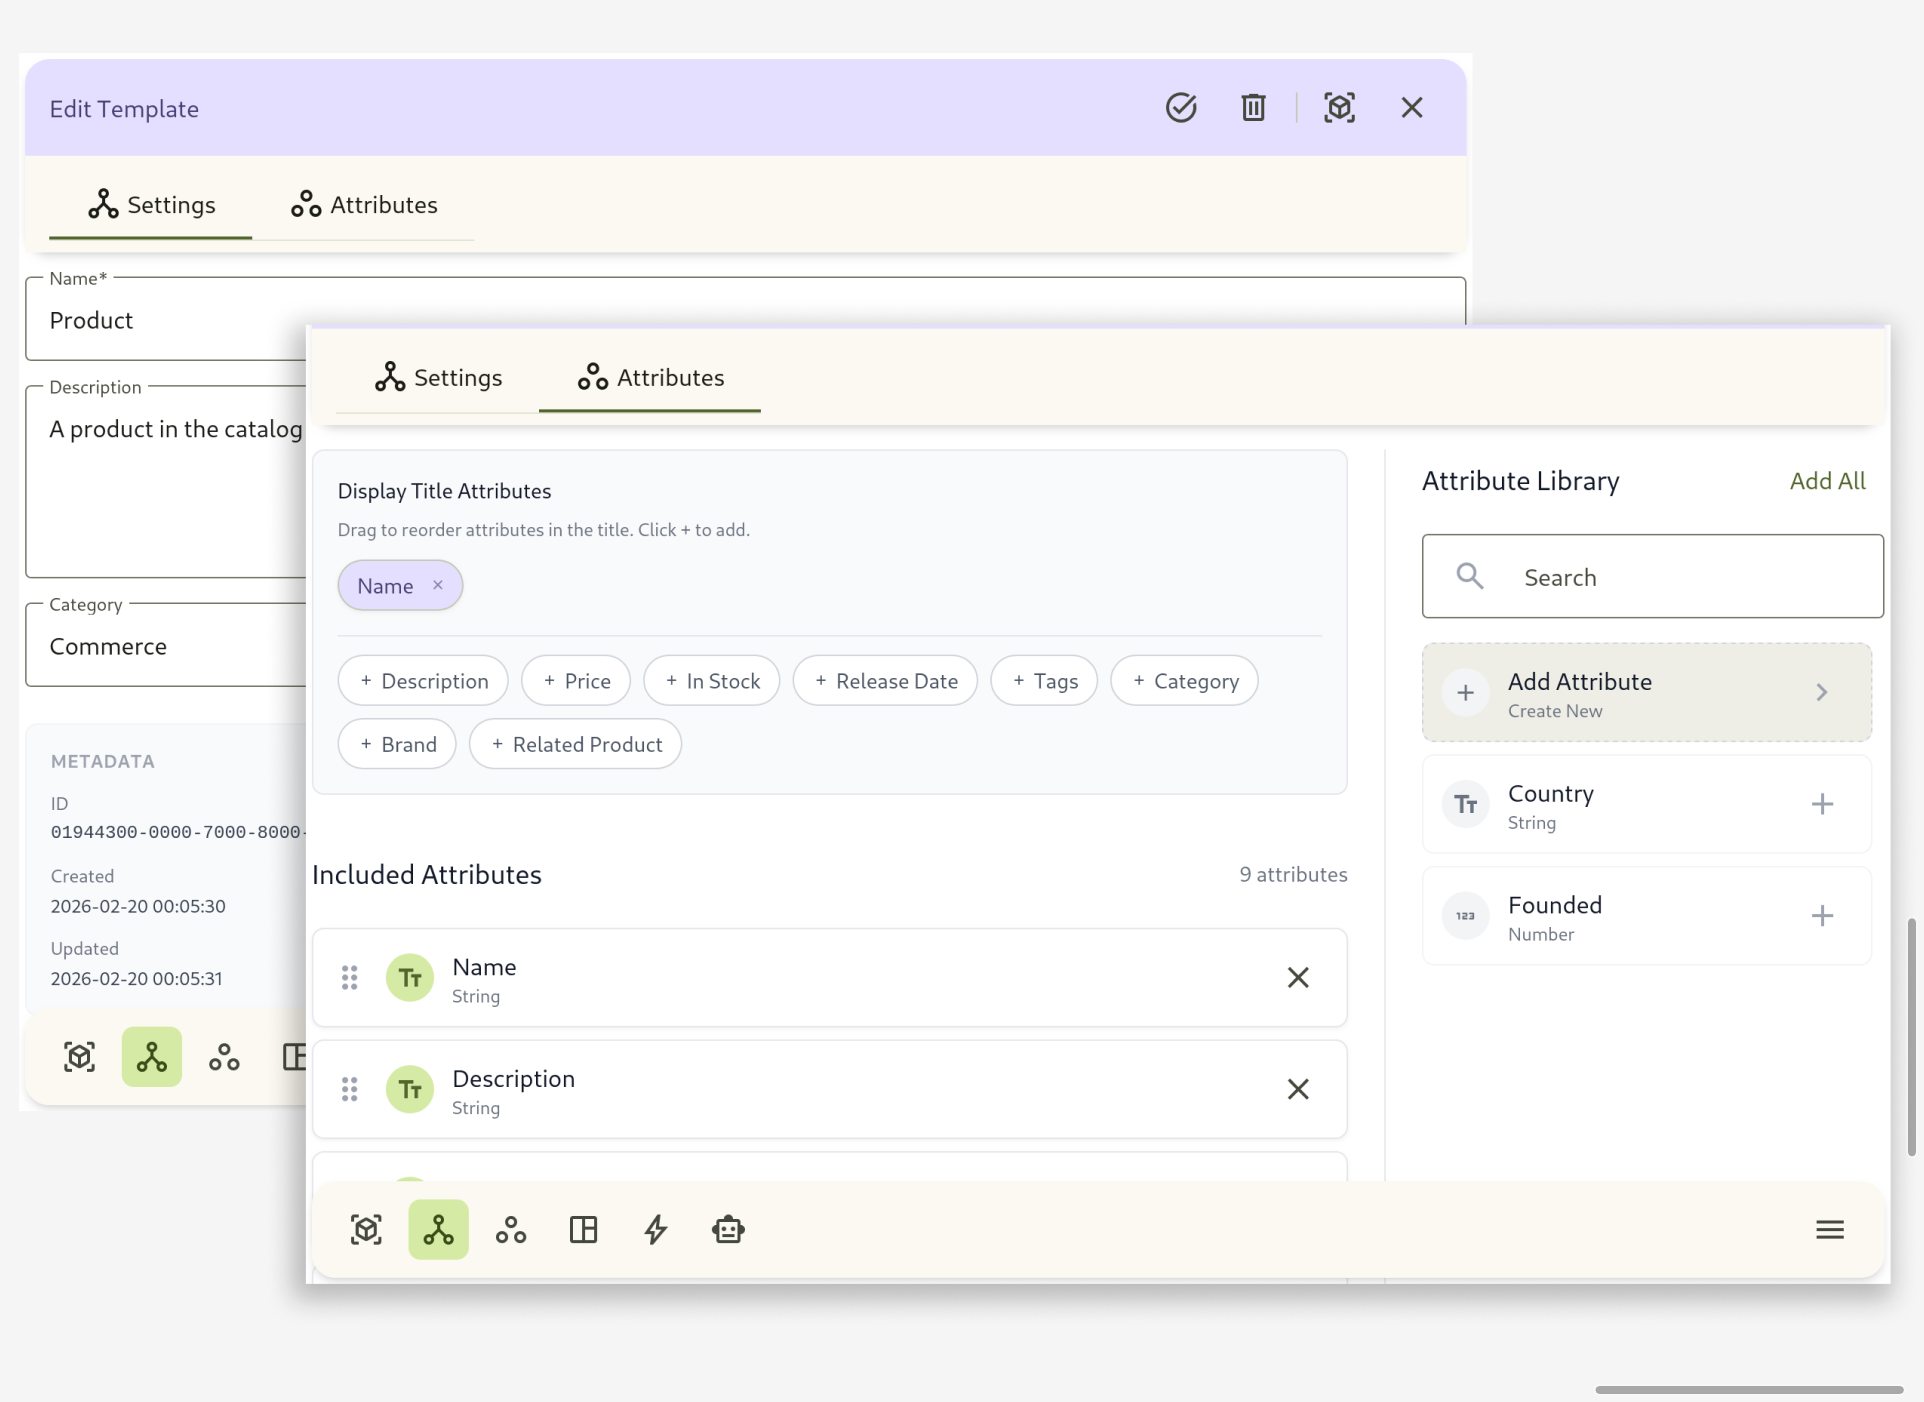
- Template Attributes panel:
- In its Attribute Library list, search your project’s attributes and click + next to each one to attach it (e.g. Hostname, Environment, Status, CPU Usage, Latency). Add Attribute creates a new attribute if the one you need doesn’t exist yet.
- Drag to reorder fields as desired.
- Optionally, pick the Display Title Attributes that make up each record’s title.
- Optionally, choose the Pinned Metrics each record summarizes. See Pinned Metrics.
- Click Create template in the save bar at the bottom of the editor.
After the template exists, the same save bar appears whenever the Schema tab has unsaved changes, with Save and Discard buttons. The other tabs, Rules, Actions and Inbound, become available once the template is saved. See Rules and Actions Live Here Too.
3. Template Slugs & Deterministic API Workflows
Section titled “3. Template Slugs & Deterministic API Workflows”Templates support string-based project-unique slugs (template_slug):
- Zero-Lookup Ingestion: External ingestion pipelines can create entities directly by specifying
template_slug: "server_node"and attribute slugs, eliminating the need to look up template UUIDs. - Cross-Environment Consistency: Deploy schemas across development, staging, and production environments deterministically using static configuration files and matching slugs.
4. Template Attribute Groups (Form Sections & Layouts)
Section titled “4. Template Attribute Groups (Form Sections & Layouts)”Templates allow organizing attached attributes into structured, visual Attribute Groups (Sections) to create clean, intuitive form layouts:
- Named Sections: Group related fields into logical blocks (e.g. General Information, Hardware Specifications, Network & Connectivity, Operational Status).
- Custom Section Headers: Set a custom Name, Description, and Icon for each group.
- Responsive 1 or 2-Column Grid: Choose between single-column full-width layouts (
columns: 1) or compact 2-column side-by-side layouts (columns: 2). - Drag-and-Drop Organization:
- Drag individual attributes between groups or move them to the Ungrouped Attributes section.
- Drag and drop entire group containers to reorder the section hierarchy.
- Entity Form Rendering: When viewing or editing an entity record (
SH-020.png), fields are neatly compartmentalized into these styled section blocks according to the template’s group configuration.
{ "name": "Server Node", "slug": "server_node", "groups": [ { "name": "System Identity", "description": "Host and environment identification", "icon": "dns", "columns": 2, "attribute_ids": ["019fe205-c125-735b-98bd-86851e8baf15"] }, { "name": "Performance Telemetry", "description": "Real-time metrics and health indicators", "icon": "speed", "columns": 2, "attribute_ids": ["019fe206-e9d6-7349-b628-f9e9474622a2"] } ]}5. Pinned Metrics (Record Summary)
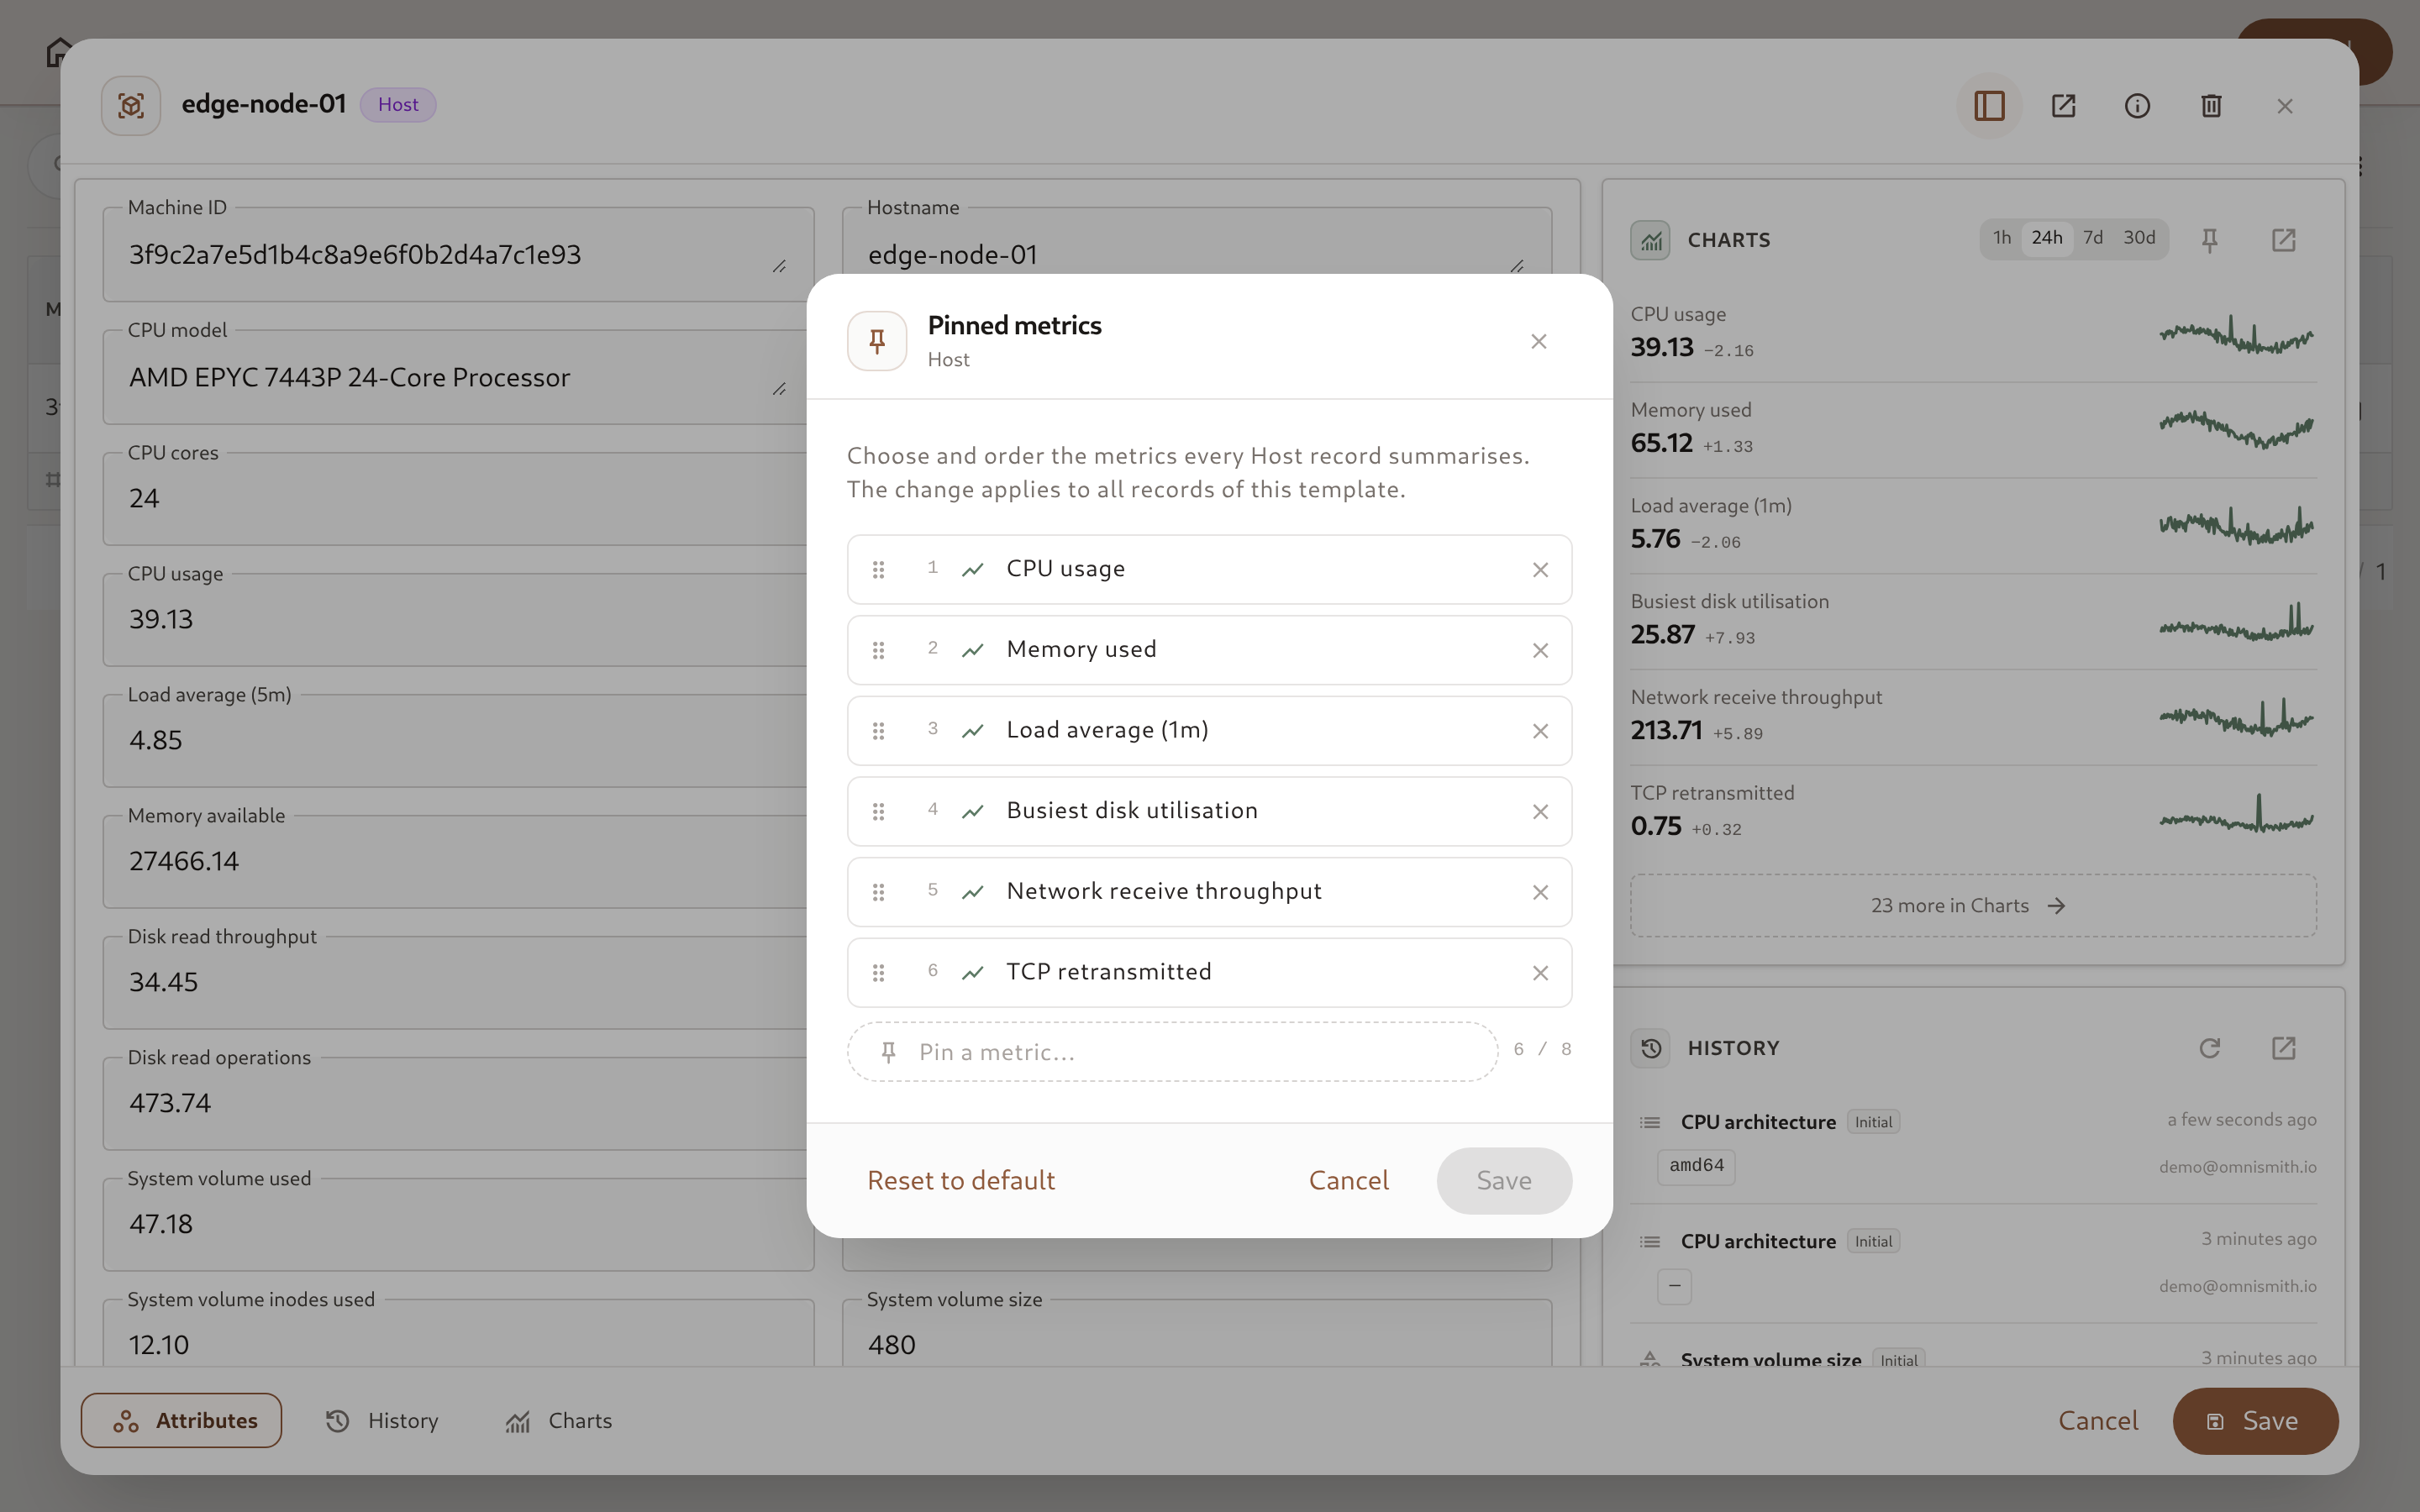
Section titled “5. Pinned Metrics (Record Summary)”Records of a template with metrics show a compact Charts summary in the side rail of their Attributes tab: each metric’s current value, a sparkline, and its change over the selected range. Pinned metrics decide which metrics that summary shows, so a template with dozens of telemetry readings still opens on the few that matter.
- Default: With nothing pinned, the summary shows the template’s first six metrics.
- Up to 8 pins, in order: Pinned metrics appear in the order you set. Only metric attributes of the template can be pinned.
- Everything else stays available: Every metric, pinned or not, is charted in the record’s Chart tab.
- Follows the schema: Detaching an attribute from the template also unpins it.
There are three places to manage the pins. Each needs permission to edit the template:
- Template editor: The Pinned Metrics panel on the Schema tab, next to Display Title Attributes. Pick metrics from the field, drag them into order, and save the template.
- A record’s summary: The pin button in the Charts summary header opens the Pinned metrics dialog. It starts from the metrics shown now, and saves straight to the template. Reset to default removes all pins.
- The Chart tab Overview: Each chart has a pin button that adds the metric to the summary or removes it.
Pinning Metrics via the API
Section titled “Pinning Metrics via the API”pinned_metric_ids is part of the template payload on create (POST /v1/templates), full update (PUT /v1/templates/{id}), and partial update (PATCH /v1/templates/{id}). It accepts attribute slugs or UUIDs and is returned as UUIDs:
curl -X PATCH "https://api.omnismith.io/v1/templates/server_node" \ -H "Authorization: Bearer omni_live_secret_key_12345" \ -H "Content-Type: application/json" \ -d '{ "pinned_metric_ids": ["cpu_usage", "memory_usage", "error_rate"] }'- Omit the field to keep the current pins. Updates from tools that don’t know about pins leave them untouched.
- Send
[]to clear the pins and return to the default. - A request is rejected with
422if it pins more than 8 metrics, an attribute that is not a metric, or an attribute that is not on the template.
6. Rules and Actions Live Here Too
Section titled “6. Rules and Actions Live Here Too”Next to the Schema tab, the template editor has two more tabs: Rules and Actions. A third tab, Inbound, holds the template’s Inbound Endpoints and is shown to users allowed to view them. Each tab label shows how many items the tab holds. These tabs become available once the template has been saved. Changes in them are saved as you make them, so the save bar applies only to the Schema tab. A rule or action can use only attributes that are already saved on the template, so save the schema after adding an attribute you want to use in one.
- Rules are
when [conditions] then [constraints]business constraints, enforced on every write to a record of this template — from the entity form, the API, CSV import, and AI agents alike. A plain required field is the simplest possible rule. - Actions are named, guided operations on one record — a precondition that gates them, fields the operator fills in, and values set silently. A status transition is just an action with a precondition and a preset; there’s no separate workflow engine.
Both are template-scoped, so they travel with the template into a Marketplace Blueprint exactly like its Attributes and Groups do.
7. Dynamic Schema Evolution (Zero-Downtime Updates)
Section titled “7. Dynamic Schema Evolution (Zero-Downtime Updates)”One of Omnismith’s greatest strengths is runtime schema flexibility:
- Adding Fields: Attach a new attribute to an existing template at any time. All existing entities under that template instantly gain access to the new field without database migrations.
- Removing Fields: Detach an attribute from a template to hide it from entity forms and search tables without destroying historical metric logs.
- Restructuring Groups: Modify section headers, column grids, or field groupings at runtime without affecting stored entity values.
- Changing Pinned Metrics: Pin, unpin, or reorder metrics at any time. Every record’s summary picks up the change immediately.
- No Downtime: Changes take effect immediately across the web UI, API endpoints, and dashboard views.